Download All Versions of Samsung Odin [2021]

While most phones use conventional fastboot to flash TWRP or Firmware, Samsung has a unique approach that is simple in comparison to other phones. For Samsung mobile phones, ODIN is a specific flashing tool. The program is so simple to use that even a complete newbie may download it and flash his or her iPhone without any instruction. Samsung Odin3 (short for Odin) is the official Samsung firmware flashing application for Windows computers. The ODIN flashing tool is the finest utility to use if you want to install Stock Firmware or TWRP on any Samsung device.

Installing firmware binaries (BL, AP, CP, CSC [CSC and HOME CSC], and PIT) or recovery images with.tar or.md5 extensions is simple with the Odin flash tool. This tool is only available for Windows users, so Mac users will be unable to use it. ODIN is also the greatest tool for flashing firmware, rooting files, and installing custom ROMs on Samsung smartphones and tablets. We'll go over all of the Odin variations, even the customized ones. With the Odin app, rooting a Samsung handset has never been easier.
Many Android devices, on the other hand, feature a Bootloader Mode as well as other modes like Fastboot and Recovery integrated into a single interface. Samsung Galaxy smartphones appear to be unique in that you must press and hold a few buttons to enter Download mode or recovery mode.
To use the Odin App, you must first meet the following requirements.
To serve as a guide, keep the following in mind before using the Odin program to flash or root any Samsung mobile device:
- The Samsung device's battery percentage must be greater than 50%.
- Backup all of the files and data on the device.
- Download and install the Samsung USB Driver.
Let’s root Samsung device using Odin
The following steps, such as the overall map, require a unique strategy for each device.
STEP 1: Enable USB Debugging Mode and OEM Unlock; these choices can be found under Settings >>> Developer settings. If you don't see the developer options in your settings menu, go to about >>> build number and repeatedly click on the "Build Number" row to activate "Developer Option" on your device.
STEP 2: Download the Samsung USB driver and install it on your computer.
STEP 3: Download the ODIN program as well. In the ODIN list, select the Oreo version mentioned above. Download and install ODIN on your computer.
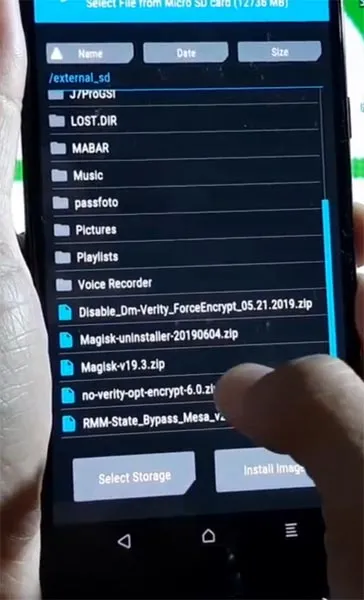
STEP 4: Copy forced encryption disabler and RMM State Bypass to your SD Card Memory. After the Root procedure, we need to flash RMM State to avoid OEM Lock in the future, and no-verity-opt-encrypt, copy it to your phone memory.
To avoid future Boot Warnings following the Root procedure, we'll need to flash the encryption disabler. All of these files should be copied to an external SD card.
Install Magisk Manager (Download the most recent version) or Magisk Canary on your mobile's external storage.
STEP 1: Depending on your model number, you should download the TWRP file.
STEP 2 : Turn off the mobile phone.

STEP 3 : Hold down the Volume Down + Power Button at the same time to enter download mode.
STEP 4: To continue, press the Volume Up button when you see the warning notice.
STEP 5: Now, open the Odin app, which you should have installed on your computer, and connect the Samsung device to your computer with a USB cable.
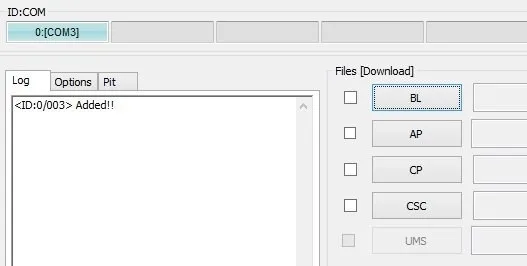
STEP 6: To show that your device is successfully linked to the Odin software, you should receive an "Added!!" notification. If you don't see this "Added" notice, repeat the steps above.
STEP 7: To retrieve the TWRP file from your computer and send/install it to your Samsung device, click on the PDA or AP.
STEP 8: Also, go to the "Options" page and uncheck the box next to "Auto-reboot."
STEP 9: To install the file on the device, click "Start."
TWRP may be used to install Magisk, no-verity-opt-encrypt, forced encryption disabler, and RMM State By-Pass on Samsung Galaxy smartphones.

STEP 1: To enter recovery mode, press and hold the Volume Up + Power Button buttons together.
STEP 2: It should now boot into TWRP Recovery Mode.
STEP 3: Advance Wipe->Wipe->Wipe->Wipe->Wipe->Wipe->W
STEP 4: Cache Data is the option to choose.
STEP 5: Return to TWRP's home page and select Install.
STEP 6: Forced encryption disabler.zip should be selected.
STEP 7: Return to TWRP's home page and select Install.
STEP 8: RMM State By-Pass.zip should be selected. The same procedure applies to the installation of no-verity-opt-encrypt and Magisk.
STEP 9:One by one, you should install them. TWRP add more zips feature should not be used. Restart your phone after the installation is complete.
STEP 10: Magisk.apk can also be installed in your mobile applications. To avoid the Encryption issue after being rooted, use no-verity-opt-encrypt. Root Checker can be used to determine your root status.
If you don't see Magisk in the App Drawer, go back to the OEM fix installation and try again.
When the device restarts, you'll see an app called Magisk, which is used to use and manage root access on Samsung Galaxy devices.
How can I remove bloatware/preinstalled apps?
To accomplish this, your device must be rooted. To install Root Cleaner, go to this link: Download Root Cleaner. Select "Uninstall" after installation to remove all undesirable apps from your smartphone.
Note: Make sure the program you're uninstalling isn't a useful system or OS app, because doing so will have an impact on your mobile device.
Additionally, you may rapidly migrate all of the programs installed on your Phone storage to an external SD card with this app. This, however, is contingent on your system permissions.
How to Unroot a Phone using Magisk
- Launch Magisk, scroll down to Home >>> Uninstall >>> Uninstall the program completely.
- In a matter of seconds, your device will be unrooted.
- After you've completed the action, uninstall the Magisk app. To check the status of your root, download Root Checker.