How to Flash Stock Recovery (TWRP) ?

Using Odin, allows users to add many sorts of functions to your Samsung Android device by flashing Custom Recovery or Stock Recovery apart from flashing the complete stock firmware or custom firmware. Generally, Samsung Galaxy devices come with a stock recovery mode that allows a few options to reboot, wipe data, etc. But if you need to flash a custom firmware or install root access or any mod file, then you will require a custom recovery like TWRP. You will need to unlock the device boot loader at first, in order to install a custom recovery. A custom recovery allows full data or system backup & restore advanced factory reset, option to install flashable ZIPs or image files. Moreover, you will simply don’t find any stock recovery. Android is known for its customization due to the stock firmware and stock recovery.
Latest Supported Samsung Devices
- Samsung Galaxy S20 Ultra
- Samsung Galaxy S20+ 5G
- Samsung Galaxy Xcover FieldPro
- Samsung Galaxy M31
- Samsung Galaxy S20 5G
- Samsung Galaxy S20
- Samsung Galaxy Z Flip
- Samsung Galaxy Tab S6 5G
- Samsung Galaxy Xcover Pro
- Samsung Galaxy S20 Ultra 5G
- Samsung Galaxy Note10 Lite
- Samsung Galaxy S10 Lite
- Samsung Galaxy A01
- Samsung Galaxy A71
- Samsung Galaxy A51
- Samsung Galaxy S20+
Prerequisites
- Required Windows PC.
- A Samsung Device with 60% - 80% Battery percentage to perform the flashing process.
- Download Samsung stock firmware.
- Download Odin latest updates.
- Download Samsung USB drivers.
- Enable USB Debugging on your Android device. Navigate to Settings > Developers options.
- Working USB data cable
- Make sure Samsung Kies is not running.
Flash Stock Recovery using Odin
Caution: Before going to start, remember to make a backup first because performing any software upgrade or flashing any firmware via Odin will wipe your data.
Step 1: Download and install the most recent Samsung Odin tool on your Windows computer. After downloading the file (compressed file), extract/unzip it to Desktop or another location you'd prefer. Then run it as an administrator on your computer.

Skip this step if you have already installed the tool.
Step 2: Unlock Bootloader
A bootloader is the system code that runs on a device before the operating system starts on the device. Every operating system has some sort of bootloaders to boot into system or recovery. In order to install any third-party, it’s necessary to unlock the device bootloader at first.
Let’s get started on how to unlock the bootloader on any Samsung Galaxy device.
Step 3: Download and install TWRP Recovery on your PC. You can find the corresponding driver software from the “Odin download link” in the forum.
Rename the downloaded TWRP file to “recovery" while flashing it.
Skip this step if you have already installed the device driver
Step 4: Download and install Samsung USB Driver on your Computer. You can find the corresponding driver software from the above “Odin download link” in the navigation bar or Samsung's official websites.
Skip this step if you have already installed the device driver
Step 5: Boot your device into download mode.
Go through these steps to boot the device into Odin Mode.
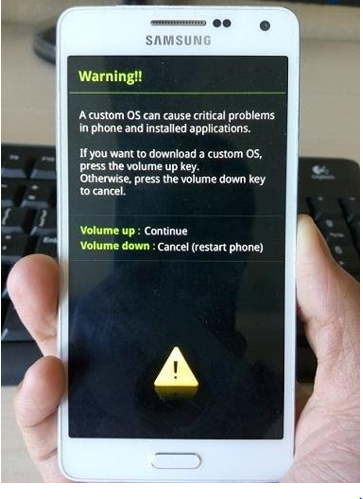
- Before proceeding , please switch off your Samsung device.
- When your device goes into complete power down status, switch it back on by pressing and holding "Home"+"Power"+"Volume Down" buttons at the same time.
- Release the buttons once you get the warning.
- Press Volume Up key to enter Download Mode.
Step 5: Connect your Samsung device to PC with a USB data cable.
Odin must detect your phone automatically. And you will be able to see the "Added"message in the Odin Log area at the lower-left of the Odin interface. In the meantime you could see a light-blue box at the ID: COM section stating "COM:3" (the number depending on which USB port you have plugged the device cable into is irrelevant).
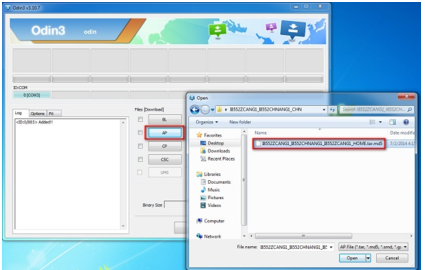
Step 6: After your Samsung device is recognized by the Odin Tool, Click "PDA" or "AP" to add the Recovery TWRP.tar file that you have already downloaded.

Caution – Do not check ‘Re-Partition’ under the Options tab.
You can also uncheck the ‘Auto Reboot’ option (optional).
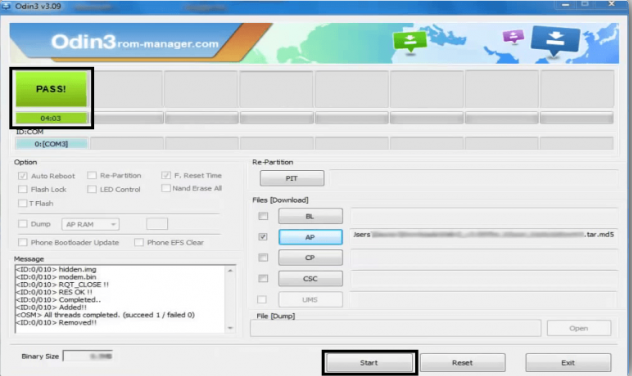
Attention – Do not unplug or operate on your device until the message "FINISHED" OR "FAILED" is displayed on Odin.
Step 7: If you see the "Green Pass Message" over the program, this indicates the flashing is completed. Then eject the USB cable from the device and your device will be rebooted automatically.
To reboot into recovery mode press and hold the Volume Up + Home + Power buttons together. [For the latest Samsung devices, press and hold Volume Up + Power together]. Reboot the phone when the cache gets brushed away. Then, your device will automatically reboot without any trouble.
That's it! That's how you can flash stock recovery (TWRP) with Odin. As you can see the procedure it's quite difficult. So, be patient and careful while doing the process. Otherwise, you'll end up with a much bigger problem on your device.