What is Flashing Custom ROM?

Flashing a Custom firmware stands for replacing content intending modifications in the firmware. It is believed this flash tool was leaked before being released by Samsung officially although they developed and internally used it. It supports users to flash the Custom firmware on their Samsung devices. This means the devices can be run or operated by 3rd-party systems, besides the original ROM.
Advantages of flashing Custom ROMs :
- There are no limitations, unlike the Stock ROM.
- It allows users to download anything without changing IP or region due to limitations. Enabling users to sideload apps, gain root access, use their device in any region, etc. without any need for circumventing the protection themselves.
- Boost device performance which enables users to get the most out of their devices.
- It presents different customization options.
- Update the system on older smartphones.
- Provides root access or administrative access.
- Battery Optimization.
Disadvantages of flashing Custom ROMs:
- Custom ROM might have potential problems due to the lack of extensive testing before release. Therefore, installing a ROM with missing or corrupt critical files can damage your phone.
- Not "Any" Custom ROM suitable for your device since some custom ROMs are made from other ones and installing such a ROMs will make your device stop working.
- With installing the Custom ROM, your data will be deleted and your phone will go to the factory settings.
- Your phone gets out of warranty service after installing Custom ROM.
Attention: Make a back up of your data because because flashing stock ROM via Odin will wipe your data.
Requirements :
- Download Odin latest Versions. Samsung stock firmware.
- Download Samsung stock firmware.
- Windows Computer.
- At least 60% - 80% battery percentage of Samsung Device to perform the flashing process.
- Enable USB Debugging on your Android device. To enable: Navigate to Settings > Developers options.
- Download Samsung USB drivers.
- USB data cable.
- Make sure Samsung Kies is not running.
Flash Samsung Custom ROM using Odin
Step 1: Download and install the most latest Samsung Odin tool on your Windows PC and extract it to Desktop or another location. Then run it as an administrator on your computer.

Step 2: Download and extract the Custom ROM zip package for your Samsung device. After downloading the file then extract it to Desktop.

You will get similar files, you will either get one .tar / .tar.md5 file or will get multiple files.
If you have received one file, it will have everything inside it: PDA + Phone + CSC.
If you have received multiple files, there will be separate files for PDA, Phone & CSC.
Skip this step again if you have already downloaded it on your computer.
Step 3: Download and install Samsung USB Driver. Find the compatible driver software from the above “Odin download link” in the sidebar of the forum or Samsung's official websites.
Step 4: Boot your Samsung device into download mode.
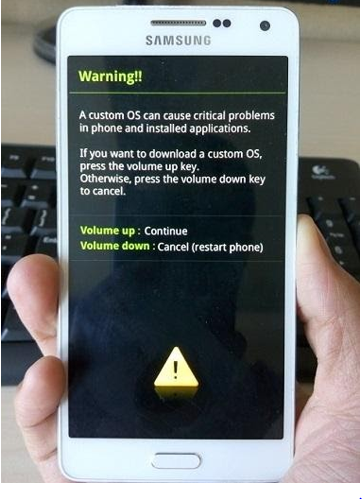
Check out these guidelines to boot the device into Download Mode.
- Switch off your device first.
- Press & hold Volume Down Key, Home Key, and Power Key together at the same time.
- Keep holding down until the Samsung Logo screen or warning message display on the screen.
- pressure the Volume Up button to enter the Download Mode.
Step 5: Connect your device to PC with a USB data cable.
Your device will be detected by Odin automatically. And you will be able to see the "Added" message in Odin interface. In the meantime, you could see a light-blue box at the ID: COM module stating "COM:3".
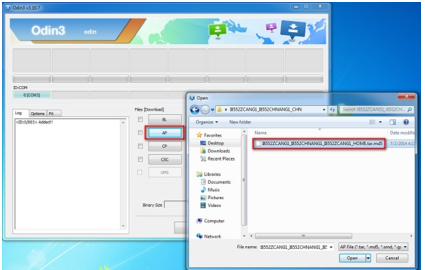
Step 6: After your Samsung device is detected by the Odin , Click "PDA" or "AP" to add thetar.md5 file that you extracted in Step 2 and then click "Start".
Clicking "PDA" or "AP" depends on the version of Odin that you used. But the md5 file will go to either "PDA" or "AP". After adding the tar.md5 file, click "Start" to begin the flashing process.

Warning – Do not unplug the USB data cable until the message "PASS" OR "FAIL" is displayed on Odin.
Step 7: After completing the flashing process successfully you will be able to see a "Green Pass Message and then eject the USB data cable from the device. Finally, choose "Wipe Data/Factory Reset" in the Recovery mode. Your device will be rebooted automatically.
